phi wrote:You must put some text in the document.
Code: Select all
\documentclass[english, 12pt]{article}
\usepackage{babel}
\usepackage{blindtext}
\begin{document}
\begin{figure}[tp]
  \centering
  \rule{10cm}{5cm}
  \caption{A Closed-Loop Control Process}
\end{figure}
\Blindtext
\end{document}
[ht] does not do anything either.
There is plenty of text in my document, I have omitted it for readability.
Here is the code on its entirety (the block of code in question is at the very end):
Code: Select all
% **************************Document Class Declaration***********************
% This is where we declare our document class (style), font size, and any
% packages that we wish to include (e.g. \usepackage{amsmath,amssymb} for
% equations and math symbols).
% **************************End Doc Class Dec********************************
\documentclass[12pt]{article} % options include: article, report, book,
%letter
\usepackage{amsmath,amssymb} % necessary for EQs and Math Symbols
\usepackage{graphicx} % necessary to insert images
% **************************PREAMBLE****************************************
% In the preamble we define all the pertinent settings for our page, such as
% margins, width of text, page sizes, etc.
\pdfpagewidth 8.5in % Height and width of the PDF
%page
\pdfpageheight 11in % to create (i.e. size of paper you'd
%print on)
\setlength\topmargin{0in} %Margin at top of page. *Add 1 inch. For
%example, setting \topmargin to 0.25in
%would produce a top margin of 1.25 inches
\setlength\headheight{0in} % Height of the header
\setlength\headsep{0in} % Distance from bottom of header to the
%body of text on a page
\setlength\textheight{7.7in} % Height and width -
\setlength\textwidth{6.5in} % of main text box
\setlength\oddsidemargin{0in} % Left margin on odd numbered pages. *Add
%1 inch
\setlength\evensidemargin{0in} % Left margin on even numbered pages. *Add
% 1 inch
\setlength\parindent{0.25in} % Amount of indentation at the first line
% of a paragraph
\setlength\parskip{0.07in} % Distance between paragraphs. Any time
% LaTeX sees a blank line, it treats the
% next line as the start of a new paragraph
% ************************End PREAMBLE**************************************
% ************************Title Page Setup**********************************
% To create a Title Page, use the following:
\title{Controls Systems Engineering}
\author{Casey}
\date{January 11, 2010}
% The title, author & date are not part of the document until the \maketitle
% command is used
% ************************End TP Setup***************************************
% **************************MAIN DOCUMENT************************************
\begin{document}
\maketitle % automatic title
\thispagestyle{empty} % Eliminates Page Number on this page only
% *************************Start main content********************************
% ***********************Introduction***************************************
\newpage
\section*{Introduction to the Notes}
These are my personal notes from Northeastern University's course entitled \emph{System Analysis and Control - ME 4555} in the Spring 2010 semester.
Ingeneral they are meant to summarize the content of classroom lectures which will also be supplemented by the text \underline{Control Systems Engineering}, 5th Ed. by
Norman S. Nise.
% ***********************Start of actual Notes*******************************
\section{Introduction}
\subsection{Introduction}
Control systems are all around us. We create control systems and control systems are also an integral part of the human body. A \textbf{Control Systen} consists of subsystems and processes (or \emph{plants}) assembled for the purpose of obtaining a desired \emph{output} with a desired \emph{performance}, given a specified \emph{input}. We build control systems for four primary reasons:
\begin{enumerate}
\item Power amplification
\item Remote control
\item Convenience of input form
\item Compensation for disturances
\end{enumerate}
\subsection{History} For a history, see \emph{Nise}, 4-8.
\subsection{System Configurations}
\textbf{Open-Loop Systems}
\noindent Generally speaking, in an \emph{open-loop system}, there is simply an input, plant and output. That is, the output is merely a function of the input and there is no intent to regulate the output by means of any \emph{looping}. Open-loop systems are generally simple and inexpensive, relatively speaking. That is all we will say on the matter as open-looop systems are not the focus of this course.
\noindent\textbf{Closed-Loop (Feedback Control) Systems}
\noindent Closed-Loop systems on the other hand are designed with the intent of \emph{controlling} or \emph{regulating} output by means of a \emph{controller}.
\subsection{Analysis and Design Objectives}
\emph{Analysis} is the proces by which the sytem's performance is determined. Design parameters such as ransient response and steady-state error are considered. \emph{Design} is a proces by which a system's performance is created or changed.
\subsection{The Design Process}
\textbf{The Six Steps As Described by \emph{Nise}:}
\begin{enumerate}
\item \textbf{Transform Requirements Into a Physical System} - using
requirements, design specifications, such as the desired tarnsient
response and steady-state accuracy are determined.
\item \textbf{Draw a Functional Block Diagram} - the designer now
translates the qualitative description of the system into a functional
block diagram that describes the component parts of the system.
\item \textbf{Create a Schematic}
\item \textbf{Develop a Mathematical Model (Block Diagram)} - after the
schematic is drawn, physical laws such as \emph{{Kirchhoff's voltage
law}}, \textbf{\emph{Kirchhoff's current law}} and \textbf{\emph{Newton's
Laws of motion}} are used to describe the relationship between the input
and output of dynamic systems.
\item \textbf{Reduce The Block Diagram}
\item \textbf{Analyze and Design}
\end{enumerate}
\begin{figure}[ht]
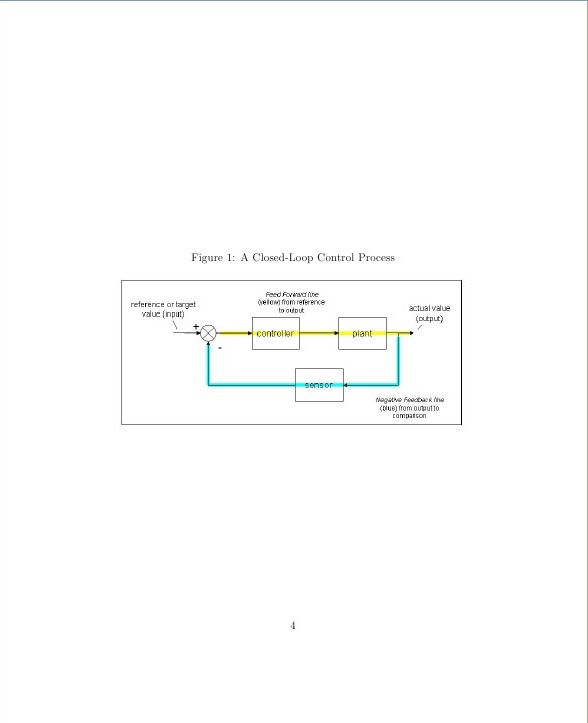
\caption{A Closed-Loop Control Process}
\center{\includegraphics[scale=0.75]{ControlProcess}}
\end{figure}
This is the output I am getting:
- lateximg.jpg (19.35 KiB) Viewed 4465 times